This is a template repository for CSC 207 projects. This repository contains starter code for a gradle project. It also contains workflow documents that give instructions on how to manage your Github repository and how to use Github Projects for efficient collaboration.
- Verify the correct settings for your project repository
- Set up Github Projects
- Create the implementation plan using issues and Github Projects
- Create deveopment branches for your features
- Use pull requests to merge finished features into main branch
- Conduct code reviews
If your team has trouble with any of these steps, please ask on Piazza. For example, with how GitHub Classroom works, your team may not have permissions to do some of the first few steps, in which case we'll post alternative instructions as needed.
-
Github Workflow: Please refer to the workflow that was introduced in the first lab. You should follow this when working on your code. The following document provides additional details too.
-
Project Planning and Development Guide: This document helps you to understand how to create and maintain a project plan for your class project. This document helps you to complete the Implementation Plan Milestone.
Import this project into your Intellij editor. It should automatically recognise this as a gradle repository. The starter code was built using SDK version 11.0.1. Ensure that you are using this version for this project. (You can, of course, change the SDK version as per your requirement if your team has all agreed to use a different version)
You have been provided with two starter files for demonstration: HelloWorld and HelloWorldTest.
You will find HelloWorld in src/main/java/tutorial directory. Right click on the HelloWorld file and click on Run HelloWorld.main().
This should run the program and print on your console.
You will find HelloWorldTest in src/test/java/tutorial directory. Right click on the HelloWorldTest file and click on Run HelloWorldTest.
All tests should pass. Your team can remove this sample of how testing works once you start adding your project code to the repo.
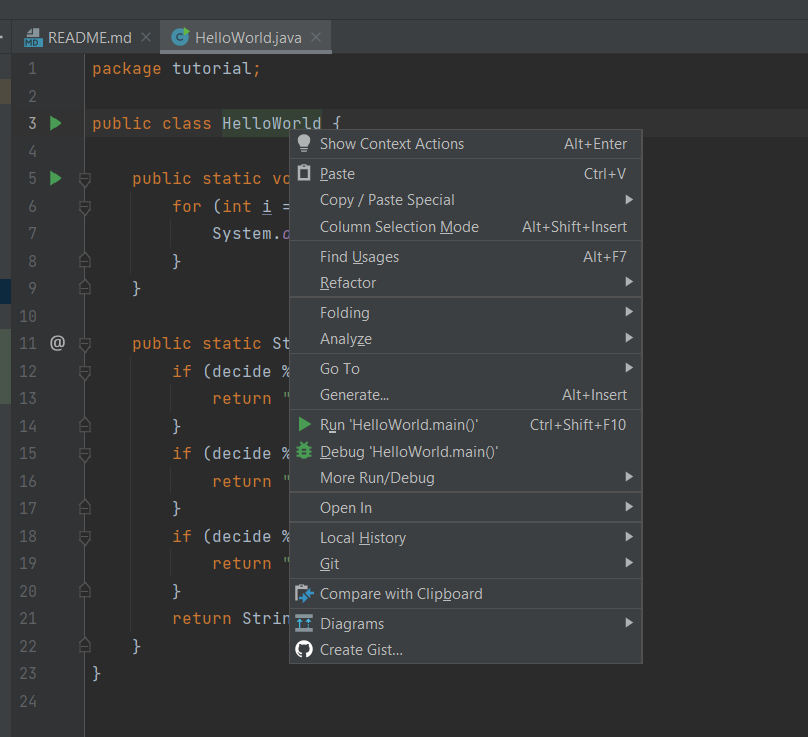
Moving forward, we expect you to maintain this project structure. You should use Gradle as the build environment, but it is fine if your team prefers to use something else -- just remove the gradle files and push your preferred project setup. Assuming you stick with Gradle, your source code should go into src/main/java (you can keep creating more subdirectories as per your project requirement). Every source class can auto-generate a test file for you. For example, open HelloWorld.java file and click on the HelloWorld variable as shown in the image below. You should see an option Generate and on clicking this your should see an option Test. Clicking on this will generate a JUnit test file for HelloWorld class. This was used to generate the HelloWorldTest.
You can create another simple class and try generating a test for this class.
Sometimes logging out doesn't work properly? The issue is unknown as it works in other cases. To use these features properly, you must change the file 'build.gradle'. Replace the dependencies section with:
dependencies {
    implementation 'junit:junit:4.13.1'
    implementation 'mysql:mysql-connector-java:8.0.28'
    testImplementation('org.junit.jupiter:junit-jupiter:5.6.0')
    implementation 'com.mysql:mysql-connector-j:8.0.31'
A local SQL database must be used until an online one is formed. The steps are as follows:
- Download MySQL Workbench.
- Set your user and password and remember these as you will need to change the code with them accordingly.
- Add a MySQL connection, hostname should be 127.0.0.1, port 3306, username and password is whatever you setup in the previous step.
- Open you connection and create a new schema with the name 'JDBC'.
- From within the schema create a new table called 'USER'.
- Within table 'USER' open a new query and run the following:
ALTER TABLE `jdbct`.`USER`
ADD COLUMN `username` VARCHAR(45),
ADD COLUMN `password` VARCHAR(45),
ADD COLUMN `email` VARCHAR(45),
ADD COLUMN `bodyfat` INT NOT NULL,
ADD COLUMN `bodyweight` INT NOT NULL;
- Make changes to the code where it says TODO.
- You can run the login system from our main class, from here everything is connected.
The graphing feature is now fully functional, and can accurately plot given data by accepting a hash map. There are six buttons, and each one is able to plot the required data by creating the necessary screen.
The only problem is that the Interactor depends on the class called ExampleDatabase in its method for getting data.This is because the storage of user input for bodyweight etc. was not completed by whoever was supposed to do it in time, so I didn't have enough time to rewrite the code to accomodate user input via the buttons.
A few of the design patterns that were used were dependency injection with the GraphFormatter and Interactor, as well as the observer design pattern in the view for button clicks.
To run the graphing feature independently, you can create a Graphmenu object with a Graph controller object as its parameter. You would also have to create a GraphInteractor variable as well as a GraphFormatter to put into the Interactor as a parameter. (You should put the username as "abc" since the ExampleDatabase file has data mapped to that username.
This feature can be used to add, delete, edit and view targets of 3 types: ORM, Volume and Weight. Each target has two components: its date and its value. A user can add upto three targets of any given type. Adding a fourth target, will delete the oldest target. The user can also edit or delete the most recently added target. The user can also want to view saved targets. To run this feature of the project run the main function in the HomeTargetUI class. All dates should be entered in the following format: DD/MM/YYYY. Entering a date of an unexpected program will throw an error. All values are of type float.
