bootstrap contains:
- a tool to flash an OS to a SDCard, an OS that will automatically set itself up upon first boot
- a tool to cross compile and push Go executables seamlessly to a Raspberry Pi or any other host accessible via ssh.
bootstrap has the following properties:
- works on Windows, OSX and Ubuntu.
- supports: Raspberry Pi running RaspiOS (32/64) Lite, ODROID-C1 running Ubuntu headless, C.H.I.P. running Debian, BeagleBone running Debian.
- exposes its flashing functionality as a Go library:
Join us for a chat on gophers.slack.com/messages/periph, get an invite here.
Yes, you can now flash an SDCard at the command line from Windows. 🎉
Bootstrapping a micro computer can be tedious. This repository contains a toolbox to enable the complete automation of the deployment of micro computers while making them low maintenance and as secure as reasonably possible.
There is intentionally no graphical application (GUI) and everything is done at the command line (CLI). There are already excellent GUI based flashing tools. This toolbox is for people wanting a complete self-contained lightweight CLI solution enabling large scale flashing of headless workers.
This toolbox was written to help manage the gohci workers, so they can be reflashed easily in case of tampering. That said, the tools are intentionally generic and reusable.
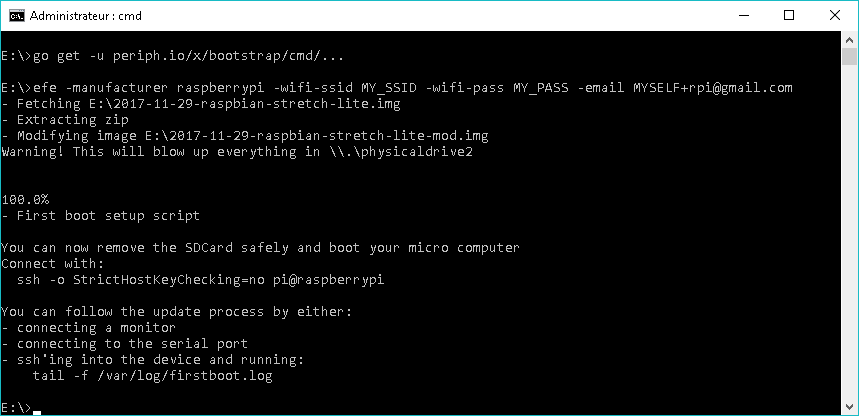
- efe flashes a modified Operating System (e.g. linux) on a SDCard that will self-configure upon initial boot by running setup.sh.
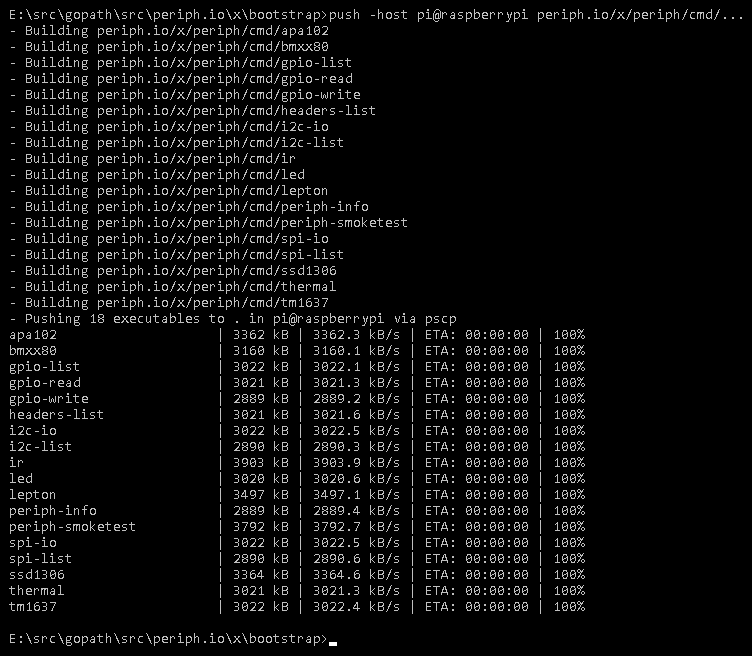
- push cross-compiles one or multiple Go binaries and transfers them to a remote host, via rsync, scp or pscp.
- setup.sh initializes a linux host by installing default tools (Go, git, ssh, vim), optionally enables Wifi (sets country, timezone, wifi ssid and password), locks it down (disables ssh password authentication, enable ssh keys) and makes it self-maintainable (automatic apt upgrade, enables sending emails).
Prerequisite: you need to have Go installed on your local machine. Then install with:
go get -u -v periph.io/x/bootstrap/cmd/...
bootstrap doesn't use cgo.
efe flashes a modified Operating System (e.g. linux) on a SDCard that will
self-configure upon initial boot.
- Fetches the latest OS image for the specified board, e.g. RaspiOS Lite for Raspberry Pi.
- Makes a working copy, then modifies the EXT4 root partition to run setup.sh upon the first boot.
- Flashes this modified image to the SDCard.
- Mounts the SDCard, then modifies the FAT32 boot partition to include
setup.shand other data, likeauthorized_keysfor passwordless ssh and settings like the Wifi credentials, country, time zone, etc.
It does so without requiring any third party software or requiring any UI application. It is completely self-contained.
This example downloads the latest RaspiOS Lite image and flashes it to an SDCard connected to the workstation. It setups the wifi and sends an email to you when it is done.
Note that once the device is booted up, the setup takes several minutes, the
hostname will be changed to raspberrypi-XXXX (or the relevant board name) and
the email sent to you might be landing in your spam folder. The email contains
the device's IP address on the LAN.
efe -manufacturer raspberrypi --wifi-ssid <ssid> --wifi-pass <pwd> -email <you@gmail.com>
efe takes care of all the steps on the micro computer's initial boot via
setup.sh.
Only -manufacturer is required, everything else is optional. For example if
-wifi-ssid is not provided, Wifi is not configured. Similarly if -email is
omitted, no email is sent at the end of the setup process. Use efe -help to
see all the options.
If your workstation has more than one removable disk, it will not select one
automatically and will ask you to specify one. You have to specify it with
-sdcard:
- Linux: it is in the form of
/dev/sdXor/dev/mmcblkN. - OSX: It is in the form of
/dev/diskX. You can identify the disk of your SDCard by running:diskutil list. It will look like/dev/disk2.
On a Raspberry Pi 3, the console UART is not enabled by default anymore. Specify
-forceuart to enable it, then use a serial cable (like FT232RL) to connect the serial pins to pins 8 and
10 on the header. Then run screen /dev/ttyUSB0 115200 on your linux host to
connect (or equivalent on other OSes).
push cross-compiles one or multiple Go binaries and transfers them to a remote
host, via rsync, scp or
pscp.
Fetches the library periph.io, then pushes all its tools to
an host named raspberrypi all at once:
go get -u -v -d periph.io/x/cmd
push -host pi@raspberrypi periph.io/x/cmd/...
Push two specific executables in the subdirectory of the current one:
push -host pi@raspberrypi ./gpio-read ./gpio-write
Use a special GOARCH instead of the default (arm), for example when targeting
a ARM64 host:
push -host user@pine64 -goarch arm64 periph.io/x/cmd/...
push depends on being able to ssh to the remote host, in addition to the Go
toolchain. Try running with -v.
Code that requires cgo will not easily be cross-compilable. Thankfully, periph.io doesn't use cgo.
First, make sure that ssh is enabled on your remote host. On RaspiOS, this
requires a specific setup.
Second, you'll need to have one of rsync/scp/pscp in your PATH. This is the
case by default on OSX and Ubuntu, but not on Windows.
For Windows, visit www.chiark.greenend.org.uk/~sgtatham/putty/latest.html and download the
MSI installer, e.g. putty-64bit-0.70-installer.msi. Install it. Find PuTTY
in your start menu and start it. Try to connect to your Raspberry Pi.
If the tool prompts for a password at every execution, you'll want to create a
ssh key with the tool ssh-keygen, copy your id_*.pub to your remote host as
~/.ssh/authorized_keys and finally make sure you have a ssh-agent running on
your host. You can do ssh-add to save the key password in memory.
On Windows, use PuTTYgen (instead of ssh-keygen) to create the ssh key. Save
it on your disk (password is recommended but not required) and copy paste the
string starting with ssh-rsa to your Raspberry Pi into a new file named
.ssh/authorized_keys, you'll need to create the directory .ssh first. Start
pageant, right click on the icon in the system tray, and select Add key.
setup.sh initializes a linux host by installing default tools (Go, git, ssh,
vim), optionally enables Wifi (set country, timezone, wifi ssid and password),
locks it down (disables ssh password authentication, enable ssh keys) and makes
it self-maintainable (automatic apt upgrade, enables sending emails).
It is a modular tool so it is possible to use all the setup steps (the default) or execute only one configuration step. It intentionally depends on as little tools to be as portable as possible.
setup.sh is automatically used by efe to do the on-device
configuration but it can also be used on a working device, for example on a
Beaglebone or a C.H.I.P. which have integrated non-removable flash.
You can use the copy included in the repository, or for your convenience use the latest copy at raw.githubusercontent.com/periph/bootstrap/master/setup.sh or the short URL https://goo.gl/JcTSsH.
For any non-trivial use, it is recommended to make a copy since the tool can be changed at any moment and is not yet fully stable. The following examples use the short URL but you can replace with your own copy, for example it can be served on the LAN via serve-dir.
To get the full list of steps and options available, download the script
first then run with --help:
curl -sSL https://goo.gl/JcTSsH -o setup.sh
bash setup.sh --help
It is also safe to run on your host.
If you already have a running device and want to run the full setup on it, use the following. That is generally what you want.
curl -sSL https://goo.gl/JcTSsH | bash -s -- --wifi-ssid <ssid> --wifi-pass <pwd> --email <you@gmail.com>
To get the full list of the operations done by default, run setup.sh in dry
run mode on the device itself. It will not do any modification on the machine.
curl -sSL https://goo.gl/JcTSsH | bash -s -- --dry-run
Installs and/or updates in-place your Go toolchain on any computer. This is super useful to mass upgrade Go on all your workers. It selects the latest version from https://golang.org/dl/.
curl -sSL https://goo.gl/JcTSsH | bash -s -- do_golang
If you want to compile the toolchain instead, which is useful if you want to work on the Go toolchain or use a beta, use instead:
curl -sSL https://goo.gl/JcTSsH | bash -s -- do_golang_compile
Keep in mind that for devices with less than 8Gb of flash, it may not have enough space for this.
ARM64 devices running a 64 bit version of the OS will automatically compile locally since there is no official ARM64 release of Go at the time of this writing.
Renames the host to <board>-<id> where <board> is one of beaglebone,
chip, odroid or raspberrypi and <id> is calculated from either the CPU
serial number or systemd's hostctl 'Machine ID'. It is very useful because the
number is deterministic, so the hostname won't change as you reflash your device
while testing and it has enough entropy that the risk of collision on a LAN is
low enough.
curl -sSL https://goo.gl/JcTSsH | bash -s -- do_rename_host
Forwards all emails sent to root@localhost via sendmail to your email address.
This one is very useful for large scale fleet, as it also enables automatic
email upon unattended-upgrade.
This permits to know when something wrong happens on the worker.
curl -sSL https://goo.gl/JcTSsH | bash -s -- --email foo@gmail.com do_sendmail
Here's the list of modications done by setup.sh. As all documentation, it
could be a bit stale so confirm with the setup.sh source code.
do_beaglebone: For Beaglebone only:- Removes apache, jekyll, X11, node-red, mysql, etc.
- Enables SPI.
do_chip: For C.H.I.P. only:- Enables SPI.
- Makes GPIO and SPI usable without root.
do_odroid: For ODROID only:- Creates a user odroid:odroid.
do_raspberrypi: For RaspiOS only:- Disables Bluetooth.
- Removes triggerhappy, installs ntpdate.
- I²C, SPI and the camera ports are enabled.
- Disables HDMI port to save ~40mA.
- Keyboard layout is set to en_US.
- Country (for wifi) and timezone is set to your country.
- Enables ethernet over USB for Raspberry Pi Zero and Zero Wireless.
do_apt:apt update&apt upgradeare run.apt install curl ssh vimis run.
do_bash_history: Injects commands in.bash_history.do_timezone: Sets up the timezone.do_ssh:- Installs
$HOME/.ssh/authorized_keysis copied from/booton the device. - Enables ssh-key authentication via
authorized_keys. - Password based authentication is disabled.
- Root ssh is disabled (yolo?). It is enabled on ODROID by default for example. Take no chance and do it unconditionally.
- Installs
do_golang_compile:- Installs git.
- Checks out https://go.googlesource.com/go into
~/golang. - Automatically selects the latest release tag and checks it out.
- Builds it.
do_golang:- Installs git.
- Fetches the right version from https://golang.org/dl/.
- Installs it as
/usr/local/go. - Creates
/etc/profile.d/golang.shto haveGOPATHandPATHsetup automatically upon login.
do_unattended_upgrade:- Setups automatic unattended apt-get upgrade every night at 3:48.
do_sendmail:- Installs bsd-mailx postfix.
- Configure
/etc/postfix/main.cfto send emails to aspmx.l.google.com over TLS. - Creates an alias for
root@localhostto redirect to the email address specified via--email. - Sends an email to confirm it works.
do_rename_host:- Changes the hostname to
$BOARD-$SERIAL[:4]where the board is the detected board and the serial number is gathered from the CPU, failing that from systemctl.
- Changes the hostname to
do_update_motd: Updates MOTD to be short:Welcome to $HOST.do_wifi:- Takes great pain to setup Wifi properly.
- Disables Wifi sleep mode on Beaglebone and C.H.I.P. to increase stability.
do_swap: Sets up a swapfile as/var/swap. Not yet run automatically.
Refer to the code for the exact list, and please send a PR for any bug fixes or improvements you think of.
bootstrap was initiated with ❤️️ and passion by Marc-Antoine
Ruel.

