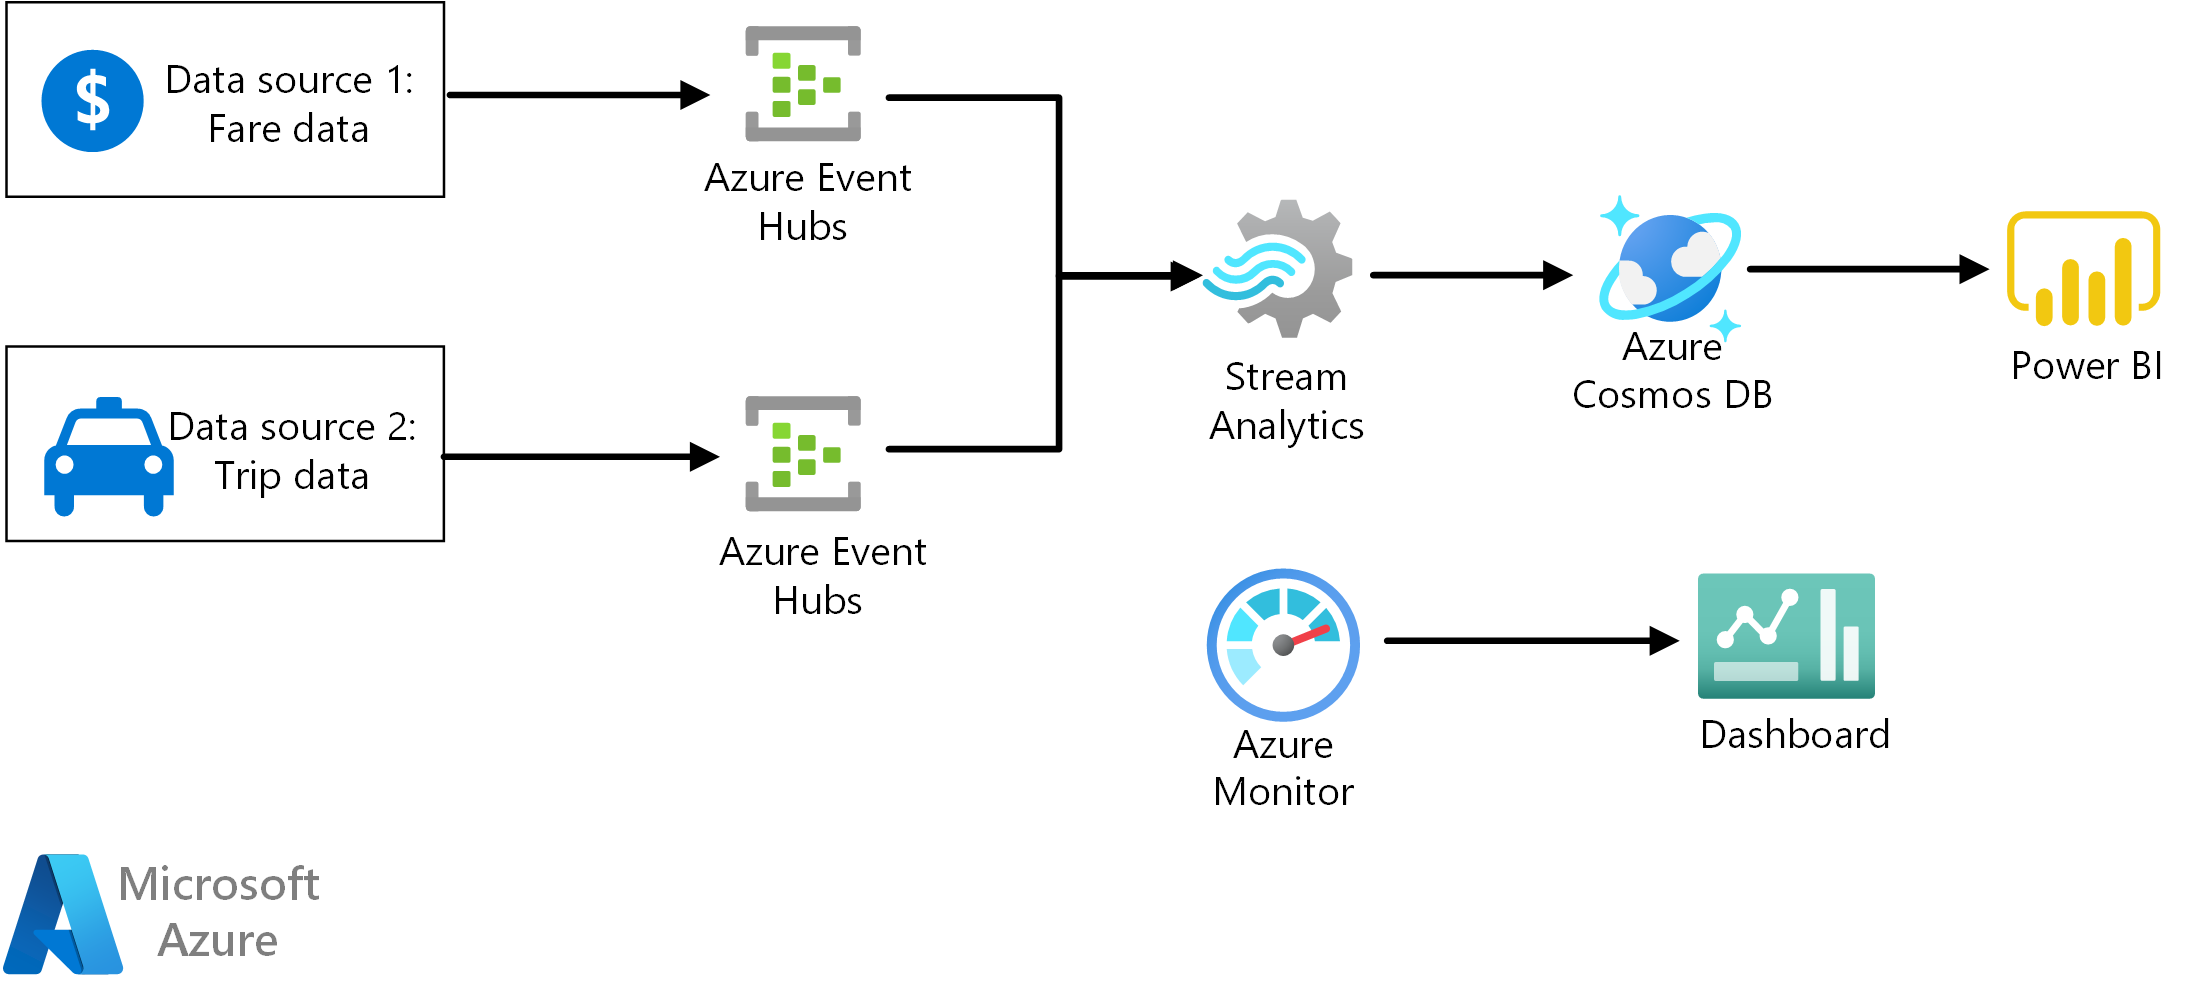
This reference architecture shows an end-to-end stream processing pipeline. The pipeline ingests data from two sources, correlates records in the two streams, and calculates a rolling average across a time window. The results are stored for further analysis.
For more information about this reference architecture and guidance about best practices, see the article Stream processing with Azure Stream Analytics on the Azure Architecture Center.
-
Clone, fork, or download the zip file for this repository.
-
Install Azure CLI 2.0.
-
From a command prompt, bash prompt, or PowerShell prompt, sign into your Azure account as follows:
az login
-
Create a directory named
DataFilein the GitHub repo. -
Open a web browser and navigate to https://uofi.app.box.com/v/NYCtaxidata/folder/2332219935.
-
Click the Download button on this page to download a zip file of all the taxi data for that year.
-
Extract the zip file to the
DataFiledirectory.This zip file contains other zip files. Don't extract the child zip files.
The directory structure should look like the following:
/DataFile
    /FOIL2013
        trip_data_1.zip
        trip_data_2.zip
        trip_data_3.zip
        ...
-
Run the following commands to deploy the Azure resources:
export resourceGroup='[Resource group name]'
export resourceLocation='[Location]'
export cosmosDatabaseAccount='[Cosmos DB account name]'
export cosmosDatabase='[Cosmos DB database name]'
export cosmosDataBaseCollection='[Cosmos DB collection name]'
export eventHubNamespace='[Event Hubs namespace name]'

# Create a resource group
az group create --name $resourceGroup --location $resourceLocation

# Deploy resources
az group deployment create --resource-group $resourceGroup \
  --template-file ./azure/deployresources.json --parameters \
  eventHubNamespace=$eventHubNamespace \
  outputCosmosDatabaseAccount=$cosmosDatabaseAccount \
  outputCosmosDatabase=$cosmosDatabase \
  outputCosmosDatabaseCollection=$cosmosDataBaseCollection \
  query='@./azure/average-tip-per-mile-pipeline.asaql'

# Create a database
az cosmosdb database create --name $cosmosDatabaseAccount \
    --db-name $cosmosDatabase --resource-group $resourceGroup

# Create a collection
az cosmosdb collection create --collection-name $cosmosDataBaseCollection \
    --name $cosmosDatabaseAccount --db-name $cosmosDatabase \
    --resource-group $resourceGroup
-
In the Azure portal, navigate to the resource group that was created.
-
Open the blade for the Stream Analytics job.
-
Click Start to start the job. Select Now as the output start time. Wait for the job to start.
-
Get the Event Hub connection strings. You can get these from the Azure portal, or by running the following CLI commands:
# RIDE_EVENT_HUB
az eventhubs eventhub authorization-rule keys list \
    --eventhub-name taxi-ride \
    --name taxi-ride-asa-access-policy \
    --namespace-name $eventHubNamespace \
    --resource-group $resourceGroup \
    --query primaryConnectionString

# FARE_EVENT_HUB
az eventhubs eventhub authorization-rule keys list \
    --eventhub-name taxi-fare \
    --name taxi-fare-asa-access-policy \
    --namespace-name $eventHubNamespace \
    --resource-group $resourceGroup \
    --query primaryConnectionString
-
Navigate to the directory
/onpremin the GitHub repository -
Update the values in the file
main.envas follows:RIDE_EVENT_HUB=[Connection string for taxi-ride event hub] FARE_EVENT_HUB=[Connection string for taxi-fare event hub] RIDE_DATA_FILE_PATH=/DataFile/FOIL2013 MINUTES_TO_LEAD=0 PUSH_RIDE_DATA_FIRST=false -
Run the following command to build the Docker image.
docker build --no-cache -t dataloader . -
Navigate back to the parent directory.
cd .. -
Run the following command to run the Docker image.
docker run -v `pwd`/DataFile:/DataFile --env-file=onprem/main.env dataloader:latest
The output should look like the following:
Created 10000 records for TaxiFare
Created 10000 records for TaxiRide
Created 20000 records for TaxiFare
Created 20000 records for TaxiRide
Created 30000 records for TaxiFare
...
Let the program run for at least 5 minutes, which is the window defined in the Stream Analytics query. To verify the Stream Analytics job is running correctly, open the Azure portal and navigate to the Cosmos DB database. Open the Data Explorer blade and view the documents.
