The pih2o project attempts to provide an automatic plant watering application out-of-the-box
in pure Python for Raspberry Pi. The watering is triggered for all plants depending on the number
of plants which need water.
The requirements listed below are the one used for the development of pih2o, but other
configuration may work fine.
The pump can be replaced by an electro valve if the tank water is upper than the plants (watering by gravity). The number of soil moisture sensors can be easily adapted from 1 to 4. The transistor is optional, the sensors can be directly connected to the 5V pin in order to power them continuously (but it accelerate their corrosion).
- 1 Raspberry Pi 2 Model B (or higher)
- 1 pump and its power supply 12V DC (or electro valve)
- 1 to 4 soil moisture sensors (Arduino TE215)
- 1 Analog-to-Digital Converter (ADS1015 or ADS1115 4 Channel I2C)
- 2 transistors NPN (type BC237B)
- 1 transistor PNP high power switch (type BDX34)
- 1 zener diode (type 1N4007)
- 2 resistors of 1.5k Ohm
- 1 resistor of 10k Ohm
- Python
3.5.3 - RPi.GPIO
0.6.3 - adafruit-ads1x15
1.0.2 - croniter
0.3.23 - blinker
1.4 - flask
1.0.2 - flask-restful
0.3.6 - flask-sqlalchemy
2.3.2
A brief description on how to set-up a Raspberry Pi to use this software.
Download latest Raspbian image and set-up an SD-card. You can follow these instructions .
Insert the SD-card into the Raspberry Pi and fire it up. Use the raspi-config tool that is shown automatically on the first boot to configure your system (e.g., expand partition, change hostname, password, enable SSH, configure to boot into GUI, etc.).
Hint
Don't forget to enable the I2C in raspi-config.
Reboot and open a terminal. Install the latest firmware version:
$ sudo rpi-update
Upgrade all installed software:
$ sudo apt-get update
$ sudo apt-get upgrade
Install
pih2ofrom the pypi repository:$ sudo pip3 install pih2o
Start the automatic plant watering application using the command:
$ pih2o
The application acts as a daemon running on the Raspberry Pi. It can be controlled thanks to an RESTful API.
The pih2o is scheduled to wake up every given interval, power the soil moisture
sensors and take humidity measurement (or threshold if no analog input available).
Finally the sensors are powered off to extend their lifespan.
Warning
Running pih2o in that way use the development server of flask which is not suitable in a production environment
The record interval (i.e. time between each humidity measurement) is defined in the Configuration using the crontab syntax which is summarized here:
                  ┌───────────── minute (0 - 59)
                  │ ┌───────────── hour (0 - 23)
                  │ │ ┌───────────── day of month (1 - 31)
                  │ │ │ ┌───────────── month (1 - 12)
                  │ │ │ │ ┌───────────── day of week (0 - 6) (Sunday to Saturday)
                  │ │ │ │ │
                  │ │ │ │ │
record_interval = * * * * *
The watering time is defined in the Configuration. The rational to dissociate the pump stop from the humidity level measured is the soil slow absorption and we want to avoid floor flooding.
Three strategies are defined to detect if watering is required by your plants depending on your configuration and the number of sensors connected.
[GENERAL][watering_strategy] = majoritymeans the pump is triggered if half of sensors are triggered.[GENERAL][watering_strategy] = firstmeans the pump is triggered if at least one sensor is triggered.[GENERAL][watering_strategy] = lastmeans the pump is triggered if all sensors are triggered.
Note
if analog channels are available: the sensor is triggered when the humidity read from the AO goes below the defined threshold (in %) else if digital channels are available: the sensor is triggered if the corresponding DO is set to 1.
If you want to use an unofficial version of the pih2o application, you need to work from a
clone of this git repository. Replace the step 5. of the Install procedure above by the
following actions:
clone from github
$ git clone https://github.com/anxuae/piH2O.git
go in the cloned directory
$ cd pih2o
install
pih2oin editable mode$ sudo pip3 install -e .
start the application exactly in the same way as installed from pypi. All modifications performed in the cloned repository are taken into account when the application starts.
At the first run, a configuration file is generated in ~/.config/pih2o/pih2o.cfg
which permits to configure the behavior of the application. The configuration can be
easily edited using the command:
$ pih2o --config
The default configuration can be restored with the command (strongly recommended when
upgrading pih2o):
$ pih2o --reset
See the default configuration file for further details.
Soil moisture sensor specification used for this project (the number is up to you but the following diagram is for up to 4 max):
| Parameter | Value |
|---|---|
| Input Voltage | 3.3 – 5V |
| Output Voltage | 0 – 4.2V |
| Input Current | 35mA |
| Output Signal | Both Analog (A0) and Digital (D0) |
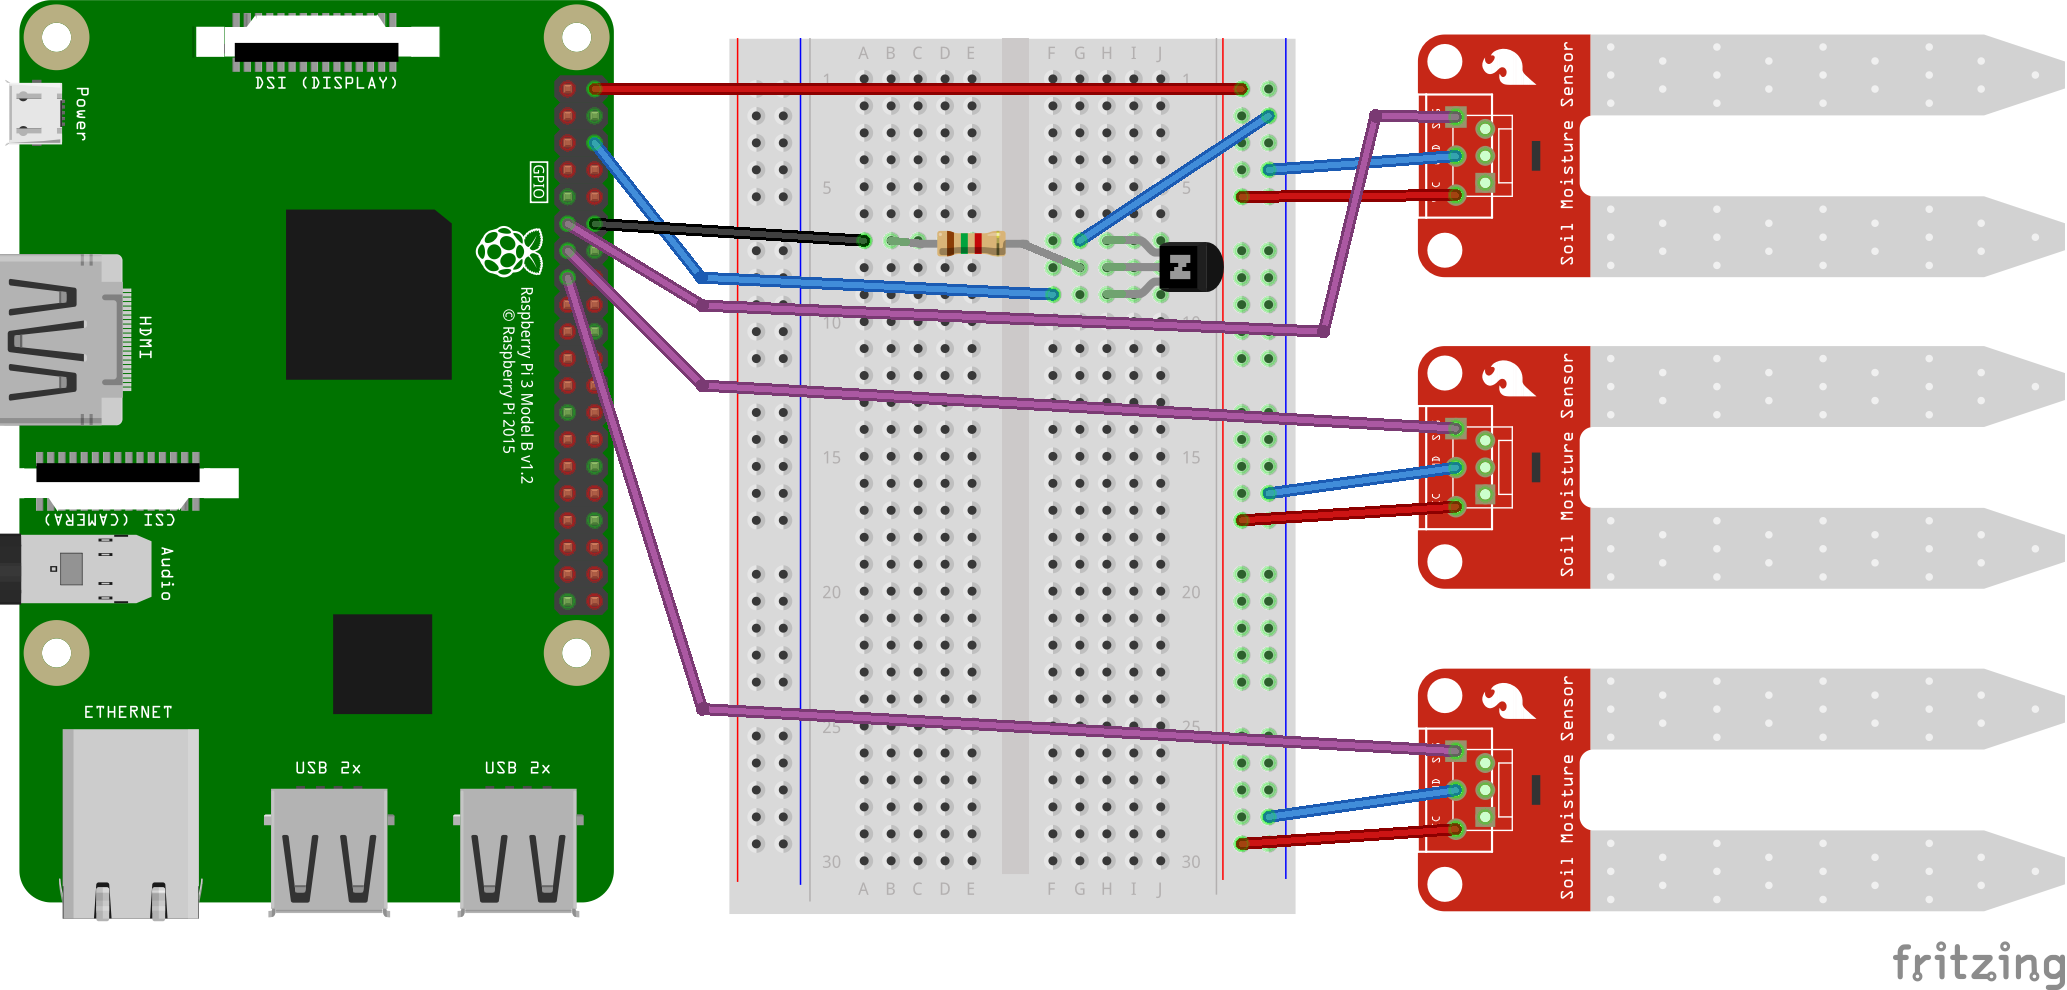
Here is the diagram for digital sensors (rise to high on dry soil). Depending on the sensor type, an signal amplifier may be necessary (not represented on this diagram).
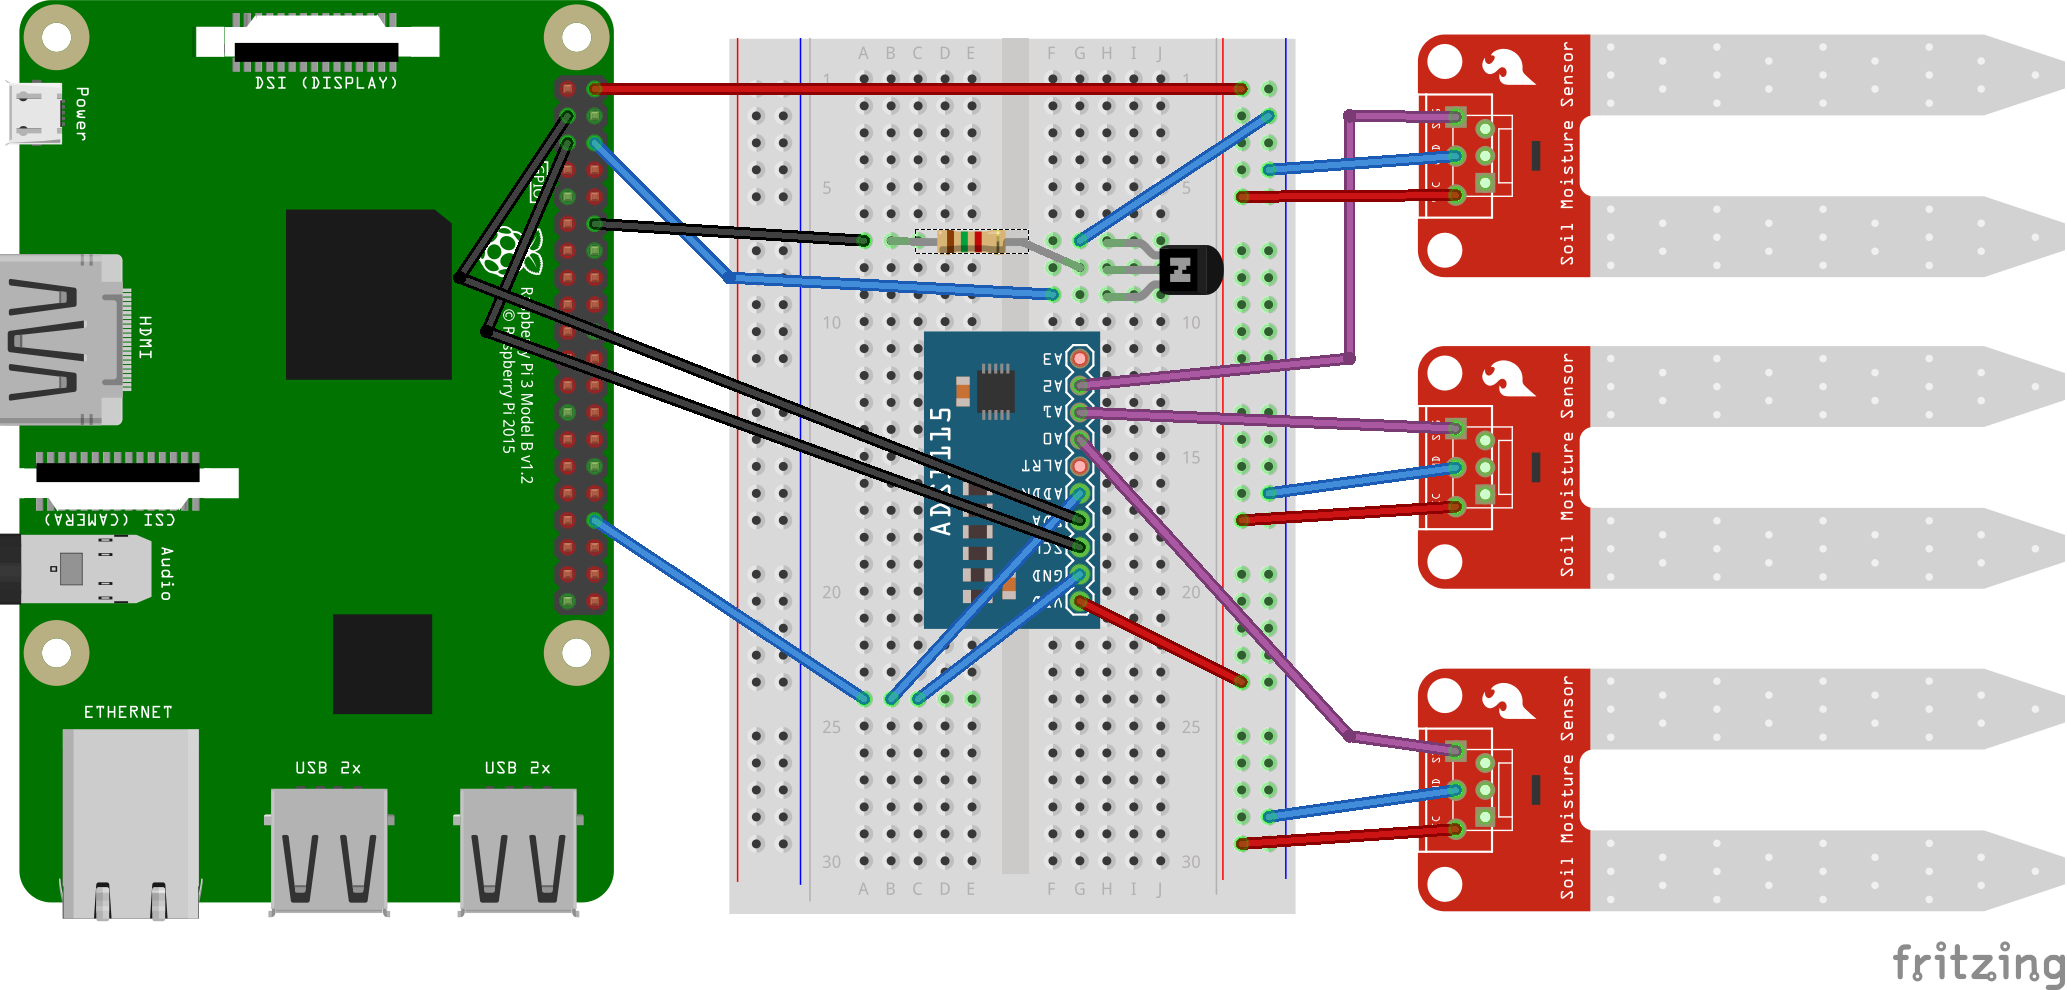
Here is the diagram for analog sensors connected to an ADC1115 to measure humidity level.
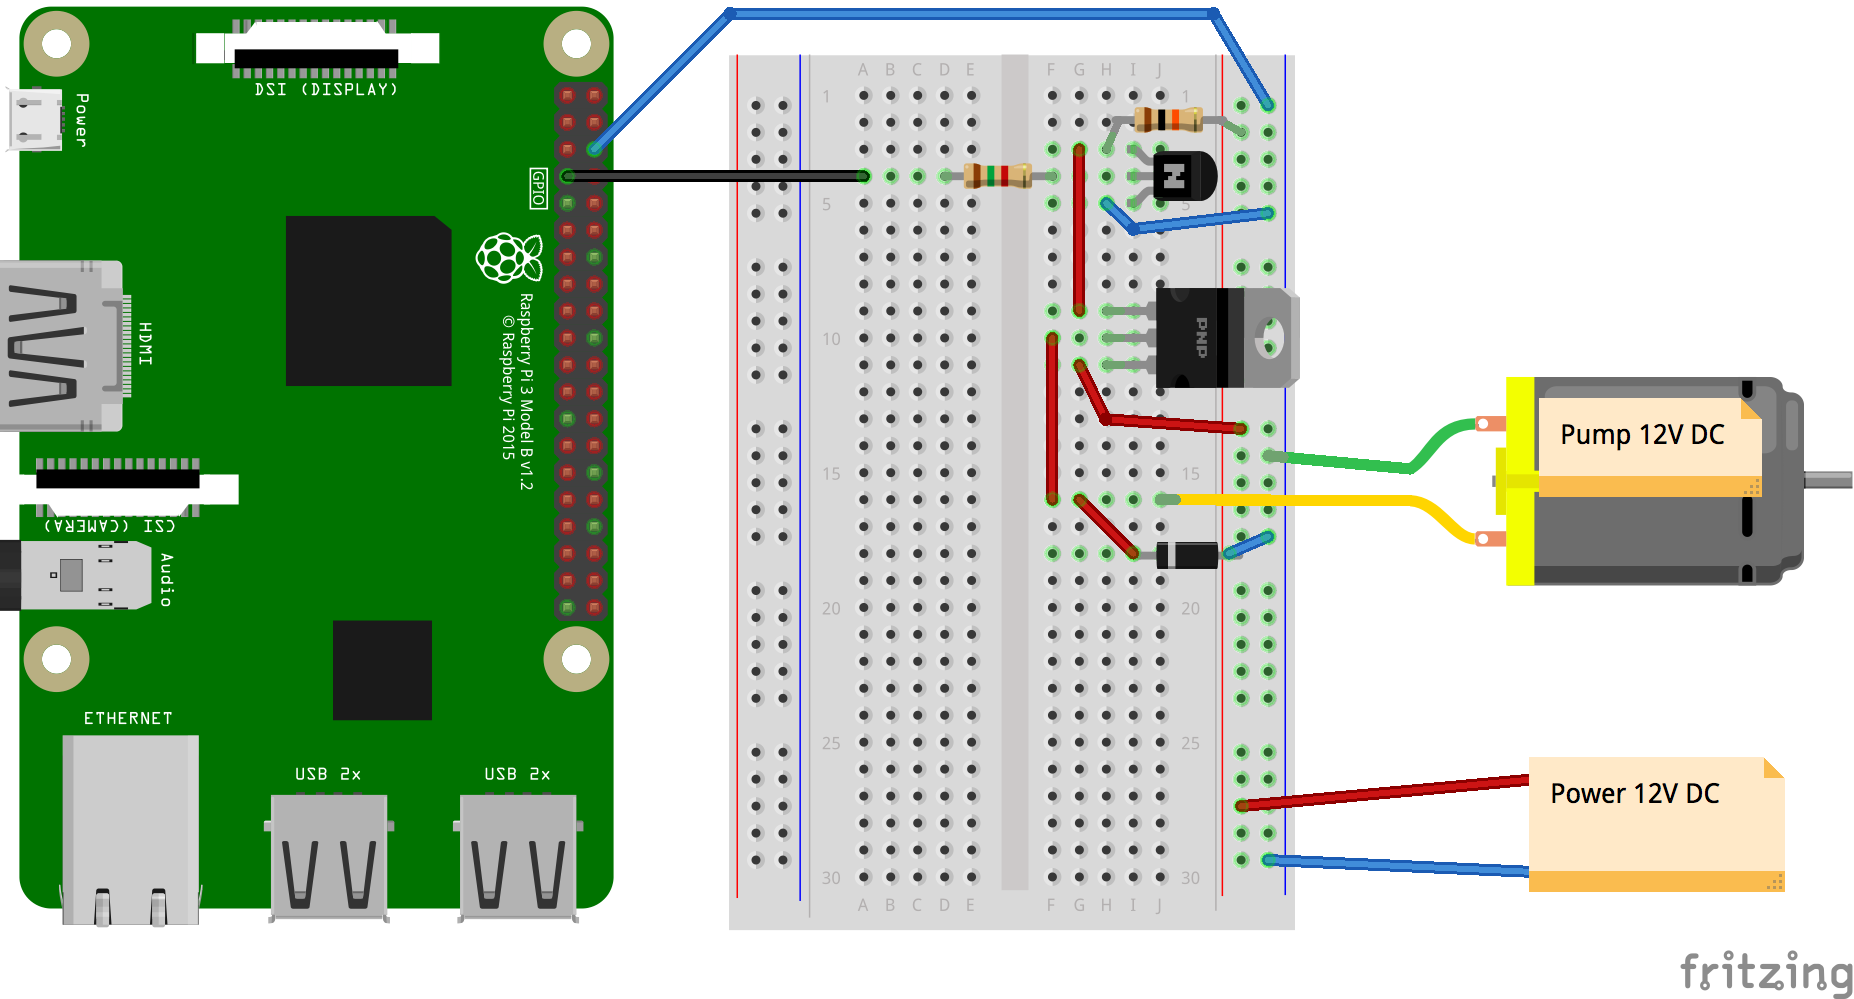
Here is the diagram for the pump (or electro valve). For better understanding the sensors are not represented here.


